Keycloak integration📜
- IdP Integration with SAML
- SAML Configuration Items
- IdP Integration with OIDC
- OIDC Configuration Items
Integrating with SAML📜
Integrating Prisma Cloud with SAML consists of setting up your IdP, then configuring Prisma Cloud to integrate with it. For keycloak integration we will use use Shibboleth as the IdP type. Here is the official SAML documentation if needed.
Setting up Prisma Cloud in Keycloak
-
These instructions assume that Keycloak is properly installed and configured with a realm other than master.
-
In Keycloak select the realm
-
On the left column, select “Clients”, then click button
Create. -
The client can be manually created. Or the example twistlock-saml-client.json can be imported after clicking the
Createbutton. Make any necessary changes and clickSavebutton. Example settings:
Client ID: platform1_00eb8904-5b88-4c68-ad67-cec0d2e07aa6_bb8_twistlock Client Protocol: saml
Settings TAB (accept defaults except for the following) Name: twistlock Sign Assertions: ON Client Signature Required: OFF Root URL: https://twistlock.dev.bigbang.mil/api/v1/authenticate Valid Redirect URIs: *
-
Select the “Installation” tab. In the
Format Option dropdownselectMod Auth Mellon files. Then click theDownloadbutton. Information from this file is needed to configure Twistlock. -
Create a test user in Keycloak for testing the Twistlock SSO authentication and ensure they are part of the group matching the hash in the client_id eg:
00eb8904-5b88-4c68-ad67-cec0d2e07aa6
Twistlock SAML configuration📜
With the init script, Twistlock SAML SSO integration along with creating additional users can be automated via sso.enabled: true and console.additionalUsers. Refer to here for more information.
Alternatively you can manually configure Twistlock SSO integration through the Administration UI. When Twistlock is deployed for the first time the login will ask you to create an admin user. Login with the admin user and follow these instructions:
-
Navigate to the Twistlock console URL. After installation you will be asked to create an admin user and enter license key.
-
(Optional) Navigate to
Manage -> Authenticationin the left navigation bar. SelectSystem Certificates(it might be in a drop down list if your browser is narrow). Enter the concatenated certificate and private key that matches your console domain. This is necessary so that the twistlock server can do TLS to Keycloak. When you click theSavebutton you will be logged out. You will have to log in again with the admin credentials. -
Navigate to
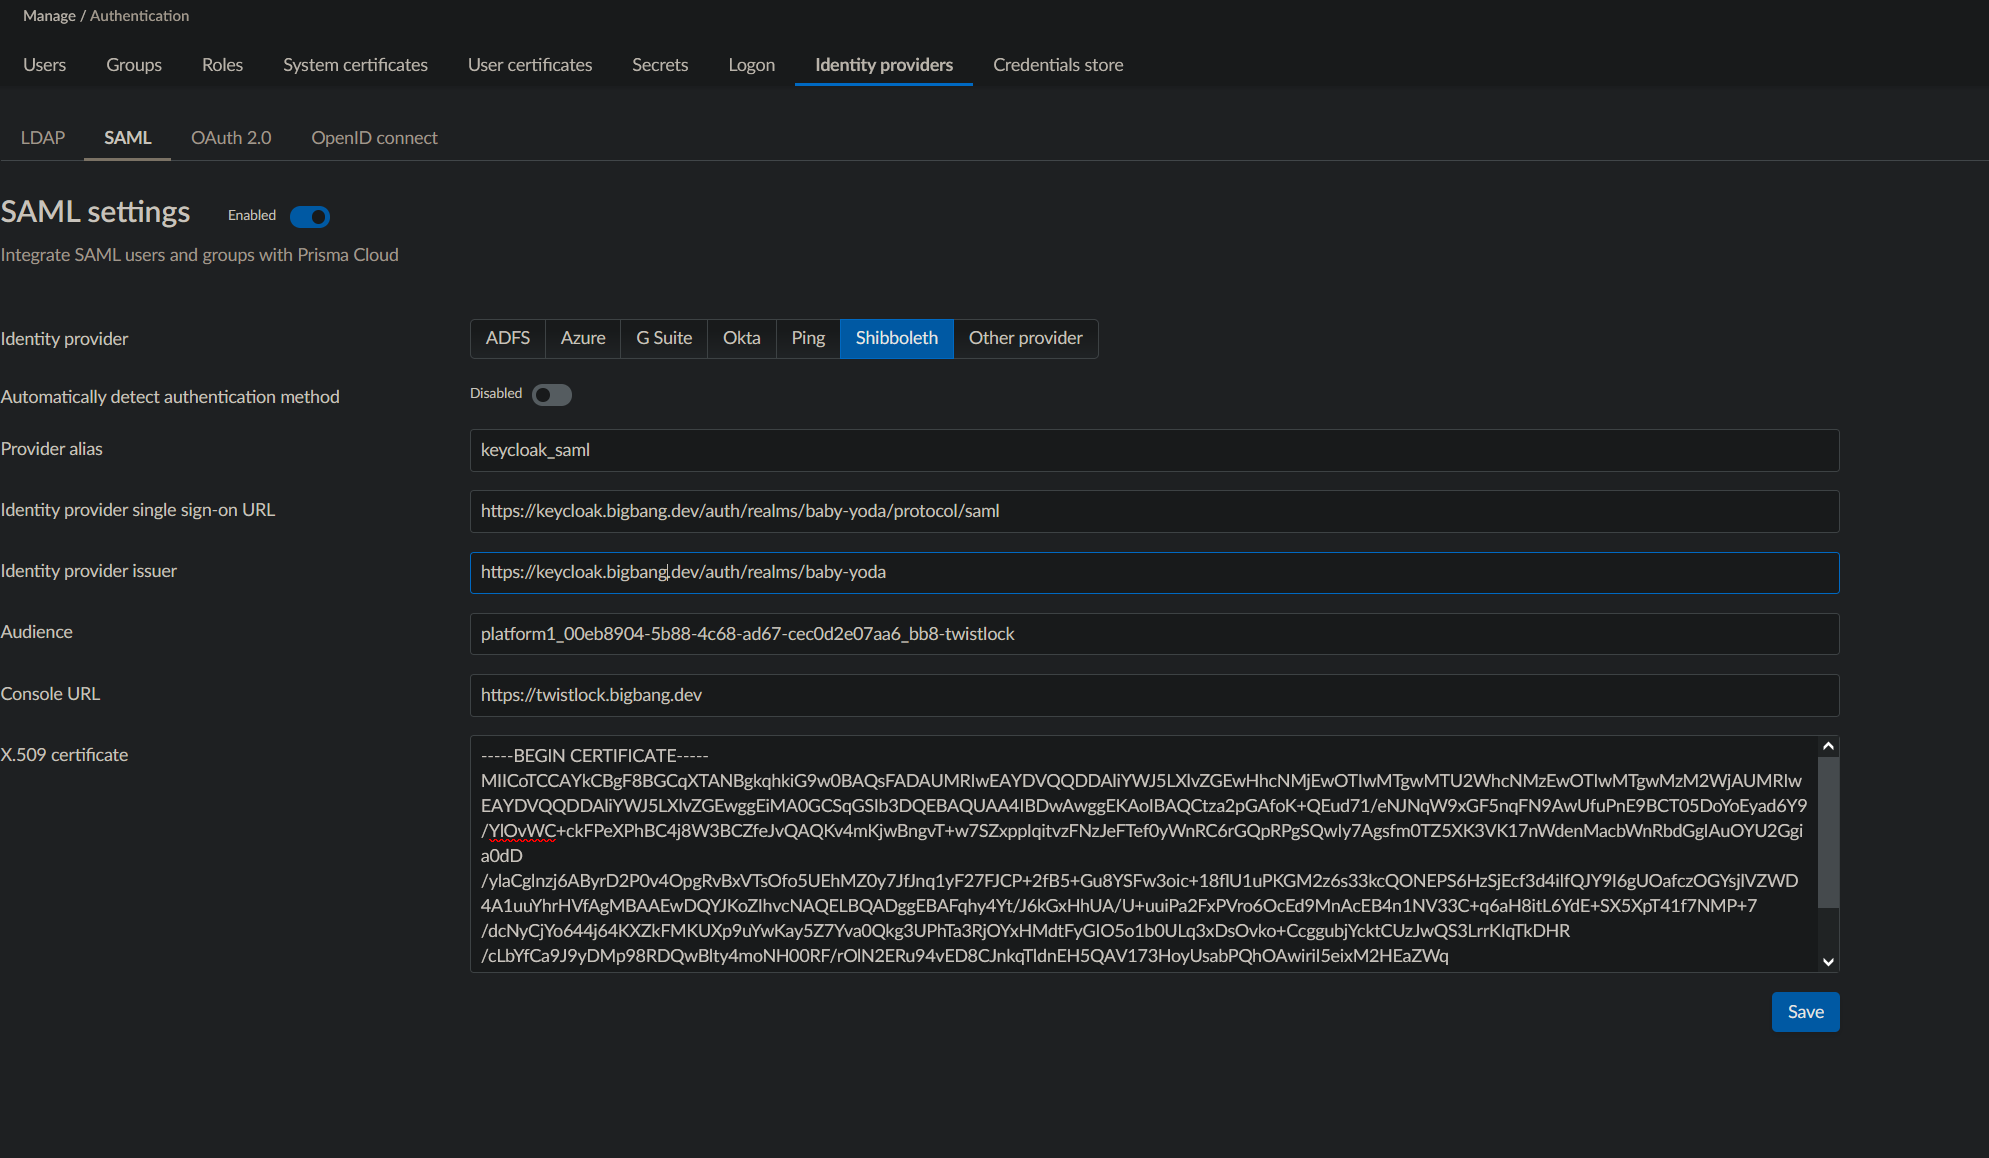
Manage -> Authenticationin the left navigation bar. Click onIdentity providersTab & selectSAML(it might be in a drop down list if your browser is narrow). Then turn on the enabled switch. Use identity provider “Shibboleth”. This provider selection was recommended by Twistlock support. -
Fill in the form. Example values are shown below. Use the values for your specific IdP. You can get the values from the installation files
idp-metadata.xmlandsp-metadata.xmlin the zip archive downloaded from Keycloak from step #6 in the previous section. a. Identity provider single sign-on URL: this is the Keycloak SAML authentication endpoint. The value can be found inside the<SingleSignOnService>tag in theidp-metadata.xmlinstallation file.https://keycloak.dev.bigbang.mil/auth/realms/baby-yoda/protocol/samlb. Identity provider issuer: enter the Keycloak URL path to the realm. The value can be found inside the<EntityDescriptor>tag in theidp-metadata.xmlinstallation file.https://keycloak.dev.bigbang.mil/auth/realms/baby-yodac. Audience: this is the Keycloak Client ID. The value can be found inside the<EntityDescriptor>tag asentityIDin thesp-metadata.xmlinstallation file.il2_00eb8904-5b88-4c68-ad67-cec0d2e07aa6_twistlockd. Console URL: This is the console URL of the Twistlock app. It is optionalhttps://twistlock.dev.bigbang.mile. x509 certificate: This is the certificate from Keycloak. The value can be found inside the<dsig:X509Certificate>tag in theidp-metadata.xmlinstallation file. The field must contain 3 lines with the begin and end certificate as show below. Do not leave any blank spaces at the beginning or ending of the 3 lines. If this is not followed exactly the SAML authentication will fail.f. When all fields in the web form are completed select “Save”.-----BEGIN CERTIFICATE----- (certificate from the install file) -----END CERTIFICATE-----
note: after SAML is added, the twistlock console will default to the keycloak login page. If you need to bypass the saml auth process add #!/login the the end of the root url.
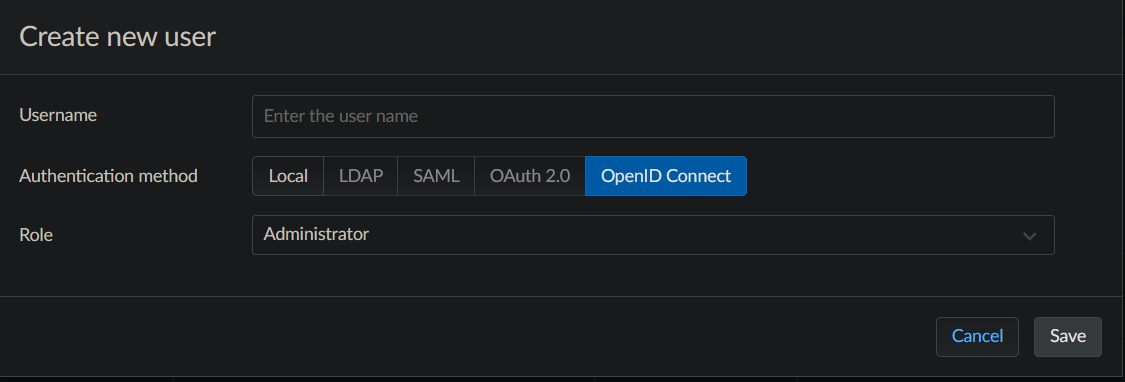
- Twistlock SSO does not create the users automatically. You must manually create the users before they can log in. Navigate to
Manage -> Authenticationin the left navigation bar. Select “Users” in the drop down list. Click theAdd Userbutton to create a twistlock user with the same name as the Keycloak user name. There should be aSAMLauth method button to select. If this selection is not visible, go to a different tab, then return to users.


Integrating with OIDC📜
Within recent versions of 21.04 Twistlock added support for OIDC Authentication.
Integrating Prisma Cloud with OIDC consists of setting up a client within your IdP, then configuring Prisma Cloud to integrate with it. Here is the official OIDC documentation if needed.
Setting up Prisma Cloud in Keycloak
-
These instructions assume that Keycloak is properly installed and configured with a realm other than master.
-
In Keycloak select the realm
-
On the left column, select “Clients”, then click button
Create. -
The client can be manually created. Or the example twistlock-oidc-client.json can be imported after clicking the
Createbutton. Make any necessary changes and clickSavebutton. Example settings:
Client ID: platform1_00eb8904-5b88-4c68-ad67-cec0d2e07aa6_bb8_twistlock-oidc Client Protocol: openid-connect
Settings TAB (accept defaults except for the following)
Name: twistlock (Optional)
Access Type confidential
Standard Flow Enabled: ON
Direct Access Grants Enabled: OFF
Valid Redirect URIs: https://twistlock.dev.bigbang.mil/api/v1/authenticate/callback/oidc
-
Click on
Client Scopestab and ensureprofileis the only “Assigned Default Client Scope” value. -
Create a test user in Keycloak for testing the Twistlock SSO authentication, and ensure they are part of the group matching the hash in the client_id eg:
00eb8904-5b88-4c68-ad67-cec0d2e07aa6.
Twistlock manual OIDC configuration📜
Within recent versions of 21.04 Twistlock added support for OIDC Authentication.
-
Navigate to the Twistlock console URL. After installation you will be asked to create an admin user and enter license key.
-
(Optional) Navigate to
Manage -> Authenticationin the left navigation bar. SelectSystem Certificates(it might be in a drop down list if your browser is narrow). Enter the concatenated certificate and private key that matches your console domain. This is necessary so that the twistlock server can do TLS to Keycloak. When you click theSavebutton you will be logged out. You will have to log in again with the admin credentials. -
Navigate to
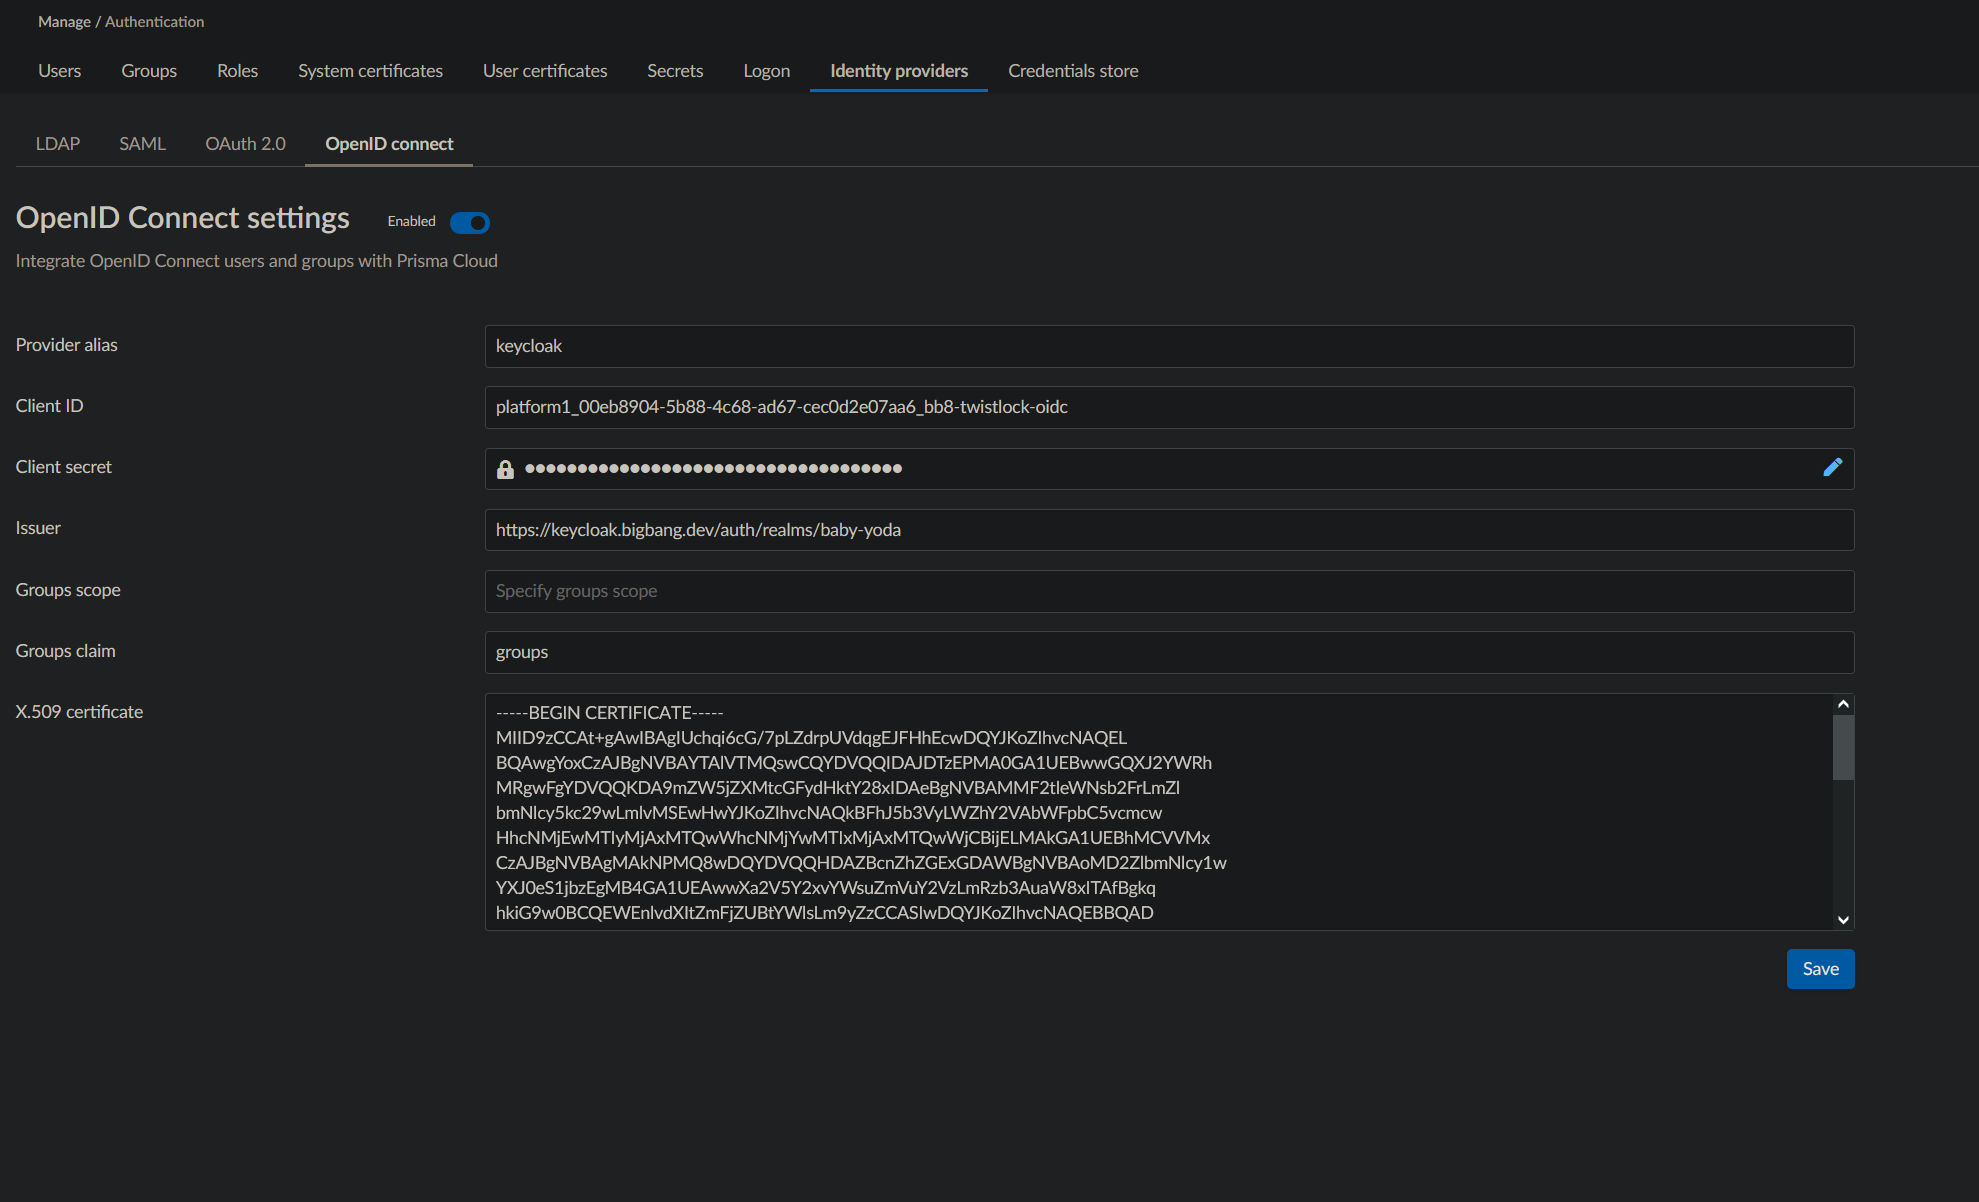
Manage -> Authenticationin the left navigation bar. Click on theIdentity providersTab & selectOpenID connect(it might be in a drop down list if your browser is narrow). Then turn on the enable switch. -
Fill in the settings form. Example values are shown below. Use the values for your specific IdP.
-
(Optional) Within the
X.509 certificatefield paste in your PEM Certificate Authority. This will be required the IdP is using a Certificate that is not trusted by the system trust store. -
Twistlock SSO does not create the users automatically. You must manually create the users before they can log in. Navigate to
Manage -> Authenticationin the left navigation bar. Select “Users” in the drop down list. Click theAdd Userbutton to create a twistlock user with the same name as the Keycloak user name. There will be anOpenID Connectauth method button to select. If this selection is not visible, go to a different tab, then return to users.